NOTE: This is a guest post by Garrett Honeycutt of LearnPuppet. As mentioned in an earlier post, we’ve been working with Garrett and his team to enhance the Sensu module for Puppet. This collaboration has brought the module to parity with other supported CM systems and full feature support for Sensu Enterprise.
This post will describe how to use Puppet to manage your Sensu systems. It assumes you have a little familiarity with Puppet and none with Sensu. The examples use Red Hat Enterprise Linux 7 (EL7) as the platform.
Why Sensu?
Sensu is a highly flexible monitoring framework, supporting both status checks and metrics collection. Its combination of flexibility and sane defaults provides 95% of your monitoring strategy out of the box, freeing you to focus on the 5% that’s unique to your infrastructure and organization. Sensu is compatible with the Nagios Plugin API, allowing users to easily migrate their legacy monitoring plugins and borrow from the tremendous ecosystem of open source monitoring checks.
Sensu’s architecture decouples servers and clients in a way that accommodates infrastructures of all shapes and sizes. But, whether your environment is highly dynamic, static, or somewhere in between, deploying Sensu requires consistent and reliable configuration management to ensure clients and servers behave as expected.
As such, Sensu’s relationship with configuration management tools like Puppet is an essential one. The Sensu Puppet module provides the classes and types you need to integrate Sensu into your custom classes or roles.
About the Module
We are very excited to have achieved Partner status with this module. This means the quality of this project is considered higher than those with Approved status, and on par with Supported modules. This was the culmination of a broad effort to deliver a better experience for the combined Puppet and Sensu community.
The Sensu module can be downloaded from the Puppet Forge and development takes place on GitHub. Support for this module is provided by Sensu, and the module currently supports the following platforms, with more on the way:
- Debian 7 and 8
- Red Hat EL 6 and 7
- CentOS 6 and 7
- Ubuntu 14.04 LTS and 16.04 LTS
- Windows Server 2008 R2 and 2012 R2
- Amazon 2017.03
The module uses Puppet strings to generate documentation from the code. Check out the module class list to see the available parameters and their data types.
Kicking The Tires
The easiest way to demo Sensu is to use our Vagrant sandbox. For this you need to install Vagrant and VirtualBox.
Check out the repo.
- Check out the repo.
$ git clone https://github.com/sensu/sensu-puppet.git
- Check out the repo.
$ cd sensu-puppet
$ vagrant up
Vagrant will start two virtual machines, sensu-server and el7-client.
Once Puppet has provisioned these systems, we should have the following processes running on sensu-server:
- RabbitMQ: Sensu clients and servers use this as the message bus
- Redis: Data store for Sensu server and API
- Sensu client: Executes checks, publishing their results to the message bus
- Sensu server: Processes check results
- Sensu API: RESTful interface to Sensu data
- Uchiwa: Web interface for the Sensu API
Vagrant exposes the following ports on the sensu-server VM (we’ll cover these in depth later on):
- Sensu API: port 4567 (authenticate as
adminwith passwordsecret) - Uchiwa: port 3000 (login with
uchiwaas username and password)
With these services running and exposed by Vagrant, we’re free to experiment with a fully functional Sensu stack. By manipulating the test fixtures in this module, or the using vagrant ssh to log into these virtual machines manually, you can configure checks, filters, mutators and handlers in this sandbox environment and observe the results via the Uchiwa dashboard or the Sensu API itself.
Taking The Plunge
Once you’ve had a chance to experiment with Sensu via the Vagrant sandbox, you’re ready to deploy Sensu for monitoring your Puppet-managed infrastructure. To get started, install the module along with it’s dependencies on your master Puppet server. Don’t worry if your versions are different.
[root@puppetmaster]# puppet module install sensu/sensu --verbose
Notice: Preparing to install into /etc/puppetlabs/code/environments/development/modules ...
Notice: Downloading from https://forgeapi.puppet.com ...
Info: Resolving dependencies ...
Info: Preparing to install ...
Notice: Installing -- do not interrupt ...
/etc/puppetlabs/code/environments/development/modules
└─┬ sensu-sensu (v2.41.0)
  ├── lwf-remote_file (v1.1.3)
  └── puppetlabs-stdlib (v4.23.0)
Next you’ll want to install the EPEL repository.
[root@puppetmaster]# puppet module install stahnma/epel --verbose
Notice: Preparing to install into /etc/puppetlabs/code/environments/development/modules ...
Notice: Downloading from https://forgeapi.puppet.com ...
Info: Resolving dependencies ...
Info: Preparing to install ...
Notice: Installing -- do not interrupt ...
/etc/puppetlabs/code/environments/development/modules
└─┬ stahnma-epel (v1.3.0)
  └── puppetlabs-stdlib (v4.23.0)
Install RabbitMQ, which the module will use to communicate with all Sensu nodes.
[root@puppetmaster]# puppet module install puppet/rabbitmq --verbose
Notice: Preparing to install into /etc/puppetlabs/code/environments/development/modules ...
Notice: Downloading from https://forgeapi.puppet.com ...
Info: Resolving dependencies ...
Info: Preparing to install ...
Notice: Installing -- do not interrupt ...
/etc/puppetlabs/code/environments/development/modules
└─┬ puppet-rabbitmq (v8.0.0)
  ├── puppet-archive (v2.2.0)
  └── puppetlabs-stdlib (v4.23.0)
Add a node entry for the server. This is also available as a Gist here. If using a multihomed system and the interface you connect to the sensu-server is not the same IP as returned by the ipaddress fact, you may need to specify client_address on line 51 with the IP address of a different interface.
# /etc/puppetlabs/code/environments/production/manifests/site.pp
# replace `sensu-server.example.com` with the FQDN of the system.
node 'sensu-server.example.com' {
 ## Begin dependencies for Sensu server
  require ::epel
  $dependencies = [
    'nagios-plugins-ntp', # Used here only to demo a check
    'redis',
    'rubygems',
    'rubygem-json',
  ]
 $dependencies.each |$dep| {
    package { $dep:
      ensure => 'installed',
      before => Class['::sensu'],
    }
  }
 service { 'redis':
    ensure => 'running',
    enable => true,
    before => Class['::sensu'],
  }
class { '::rabbitmq':
    # By default, rabbitmq creates a user guest:guest,
    # however they can only authenticate from localhost.
    # Delete the guest user since a sensu user will
    # be created in the rabbitmq.sh script.
    delete_guest_user => true,
    require           => Class['::epel'],
    before            => Class['::sensu'],
  }
  ## End dependencies for Sensu server
  class { '::sensu':
    install_repo      => true,
    server            => true,
    manage_services   => true,
    manage_user       => true,
    rabbitmq_password => 'correct-horse-battery-staple',
    rabbitmq_vhost    => '/sensu',
    spawn_limit       => 16,
    api               => true,
    api_user          => 'admin',
    api_password      => 'secret',
    #client_address   => $::ipaddress_eth1,
    subscriptions     => ['all', 'roundrobin:poller'],
    require           => Class['::epel'],
  }
 ## Begin setup of handler and check for demo
  sensu::handler { 'default':
    command => 'mail -s \'sensu alert\' ops@example.com',
  }
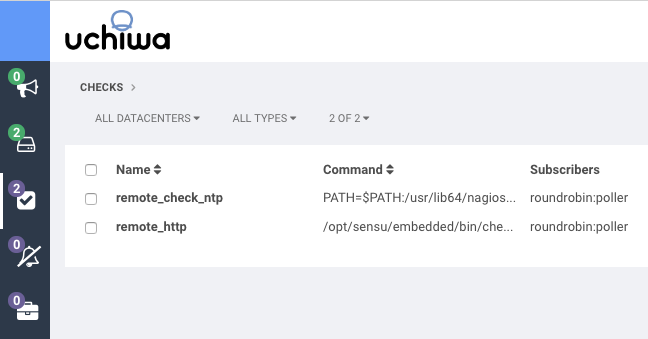
  sensu::check { 'check_ntp':
    command     => 'PATH=$PATH:/usr/lib64/nagios/plugins check_ntp_time -H pool.ntp.org',
    handlers    => 'default',
    subscribers => 'sensu-test',
  }
  ## End setup of handler and check for demo
  ## Uchiwa - The Dashboard does not have it's own Puppet module
  package { 'uchiwa':
    ensure => 'installed',
  }
 file { '/etc/sensu/uchiwa.json':
    ensure  => file,
    content => '
{
 “sensu”: [{
      "name": "Site1",
      "host": "127.0.0.1",
      "port": 4567,
      "timeout": 5,
      "user": "admin",
      "pass": "secret"
    }
  ],
  "uchiwa": {
    "host": "0.0.0.0",
    "port": 3000,
    "user": "uchiwa",
    "pass": "uchiwa",
    "interval": 5
  }
}’,
    require => [
      Package['uchiwa'],
      Class['::sensu'],
    ],
    notify  => Service['uchiwa'],
  }
 service { 'uchiwa':
    ensure  => running,
    enable  => true,
    require => [
      File['/etc/sensu/uchiwa.json'],
      Package['uchiwa'],
    ],
  }
}
Finally, run puppet on the Sensu server to apply our manifest.
$ vagrant ssh sensu-server
[vagrant@sensu-server ~]$ sudo su -
[root@sensu-server]# puppet agent -t
RabbitMQ
As mentioned earlier, Sensu servers and clients use RabbitMQ as a message bus. Setting up RabbitMQ is beyond the scope of the Sensu puppet module, so please see the RabbitMQ module documentation for details on it’s usage.
Note that RabbitMQ needs a user that Sensu can connect to. The default guest user can only connect over localhost since RabbitMQ version 3.3.0. If you can’t log into the web portal, you may need to reset the password:
[root@sensu-server]# rabbitmqctl change_password sensu correct-horse-battery-staple
Once RabbitMQ has been configured, you can check out its dashboard to verify that clients have connected. The RabbitMQ dashboard for our vagrant setup can be found at http://localhost:15672 (username sensu, password correct-horse-battery-staple).
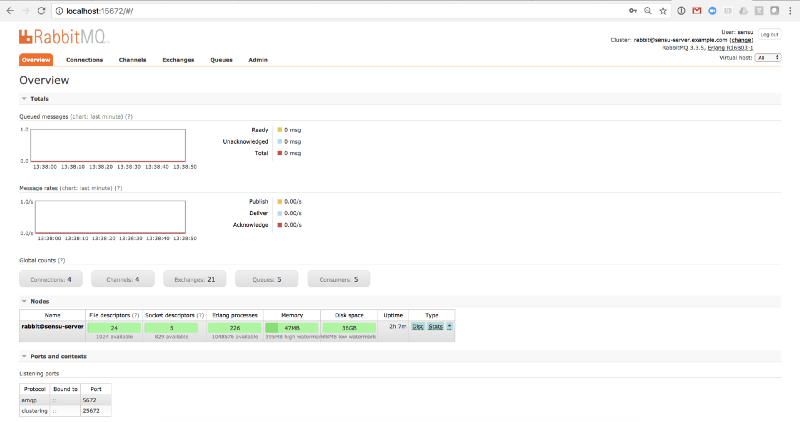 RabbitMQ dashboard on sensu-server
API
Sensu’s RESTful API is now exposed on tcp port 4567. It provides access to monitoring data collected by Sensu, such as a client registry, check results, and event data. The API can be used to request adhoc check executions, and resolve events, among other things.
Check out the documentation at https://sensu.io/docs/latest/api/ for a comprehensive reference and examples for using the Sensu API.
Example API query
The following command will query the API to retrieve the list of known clients. If you’re not using the aforementioned Vagrant setup, replace 127.0.0.1 with the IP address or name of the Sensu server.
$ curl -s http://admin:secret@127.0.0.1:4567/clients
Which results in the following JSON output.
[{"name":"sensu-server.example.com","address":"10.0.2.15","chef":{},"ec2":{},"http_socket":{"bind":"127.0.0.1","port":3031},"keepalive":{},"puppet":{},"safe_mode":false,"servicenow":{},"socket":{"bind":"127.0.0.1","port":3030},"subscriptions":["all","roundrobin:poller","client:sensu-server.example.com"],"version":"1.0.2","timestamp":1506477439},{"name":"el7-client.example.com","address":"192.168.56.11","chef":{},"ec2":{},"http_socket":{"bind":"127.0.0.1","port":3031},"keepalive":{},"puppet":{},"safe_mode":false,"servicenow":{},"socket":{"bind":"127.0.0.1","port":3030},"subscriptions":["all","client:el7-client.example.com"],"version":"1.0.2","timestamp":1506477436}]
Dashboard
The Uchiwa dashboard displays information for all Sensu clients, checks, events, and more. The web interface in our vagrant setup can be found at http://localhost:3000 (username uchiwa, password uchiwa).
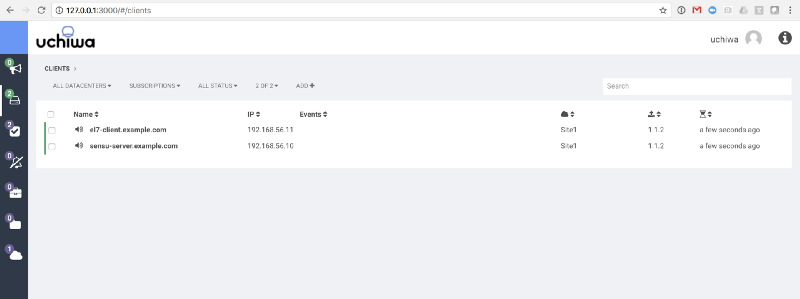 List of known Sensu clients.
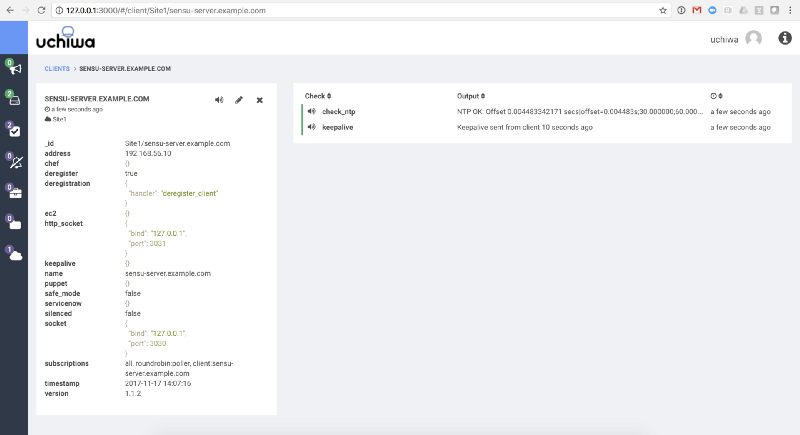 Detailed status for our sensu-server client.
Managing the Sensu clients
The following snippet can be used on each additional node that you want to register with Sensu. Once this is applied to a node you should begin seeing the client appear in the API clients output and in your Uchiwa dashboard.
# If using a multihomed system, you may need to change the interface
$ip = $facts['networking']['interfaces']['eth1']['ip']
class { '::sensu':
  rabbitmq_password => 'correct-horse-battery-staple',
  rabbitmq_host     => '192.168.56.10',
  rabbitmq_vhost    => '/sensu',
  subscriptions     => 'all',
  client_address    => $ip,
}
Summary
Introducing Sensu to your existing Puppet-managed infrastructure is a quick and easy way to increase the visibility into your automated architecture. And because Sensu is first and foremost a monitoring framework, you can easily extend it to support your business as it grows and your needs evolve.
If you have any questions about using Sensu with Puppet, join us in the Sensu Community Slack and ask me anything in the #puppet channel!
About the author
Garrett Honeycutt has been using Puppet for 10 years, consulting and training companies of all sizes around the globe. He runs LearnPuppet, a company focused on automation and specializing in Puppet consulting, training and implementing CI/CD and other DevOps practices. He also provides support for the Sensu puppet module.
Thanks to Matthew (Brender) Broberg.
Related Posts

Infrastructure as code: evolution and practice
As the velocity of deployments increased, and practices such as CI/CD became the norm, it became critical that we manage infrastructure and deploy applications in a similar way. In this post, we take a look at the evolution of infrastructure as code (IaC)

Announcing v4 of the Sensu Puppet module
Here's what's new with the Sensu Puppet module (and where you can try it out for yourself).

💪 Unlocking another level of automation with Sensu Go 6
Sensu CTO and co-founder Sean Porter shares how we’re unlocking another level of automation with Sensu Go 6.

Made with #monitoringlove by SensuTM in Canada 🇨🇦 and the USA 🇺🇸. © 2017-2021 – Privacy Statement – Terms & Conditions